Salted CX retrieves data to be able to analyze them. You need to enable access of Salted CX to Salesforce. During this process, you will need to collect information that is necessary. When you encounter this information, store this information securely and share it with Salted CX.
Salted CX needs the following information to connect to Salesforce:
- Consumer Key
- Customer Secret
- Salesforce API User Username
- Salesforce API User Password
- Salesforce API User Secret Token
To enable access to Salesforce and collect all necessary information you will go through the following steps:
- Add Connected Application. This adds Salted CX as an application to Salesforce. Only connected applications can retrieve data from Salesforce.
- Create Salesforce Profile. This profile in Salesforce will contain all permissions that Salted CX has when accessing Salesforce.
- Create Salesforce API User. Salted CX will use this credentials to log into your Salesforce instance. The user also serves as a single point that can be deleted to remove access to data from Salted CX.
- Retrieve Secure Token. This token is used by Salted CX for authorization against the API.
This guide is an example Salesforce setup. You might use different methods of giving access to your Salesforce. The critical part for Salted CX to work properly is to have read-only access to Bulk Export API 2.0 and permission to access setup and configuration API that is used to prevent hitting Salesforce rate limits for the API use.
Add Connected Application
Connect Salted CX do the following steps in your Salesforce:
-
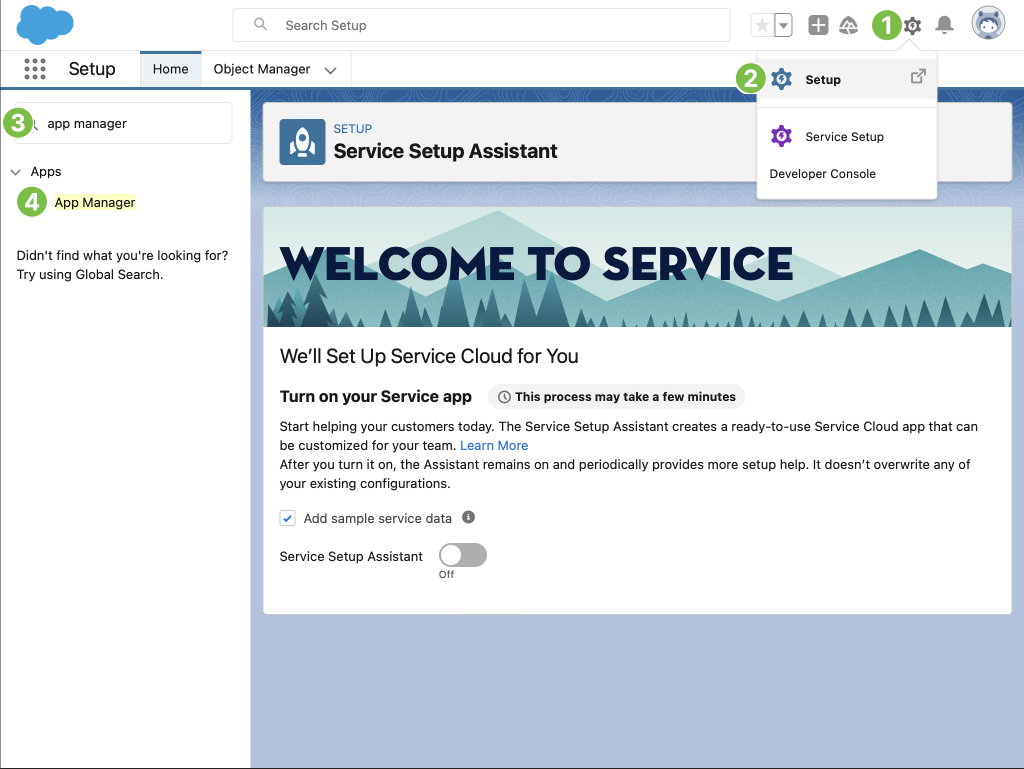
When logged in to your Salesforce, press gear button in the top right corner
-
In the menu press Setup
-
In the Setup application, press the Quick Find field in the top right corner and search for App Manager
-
Press App Manager in the navigation to open it
-
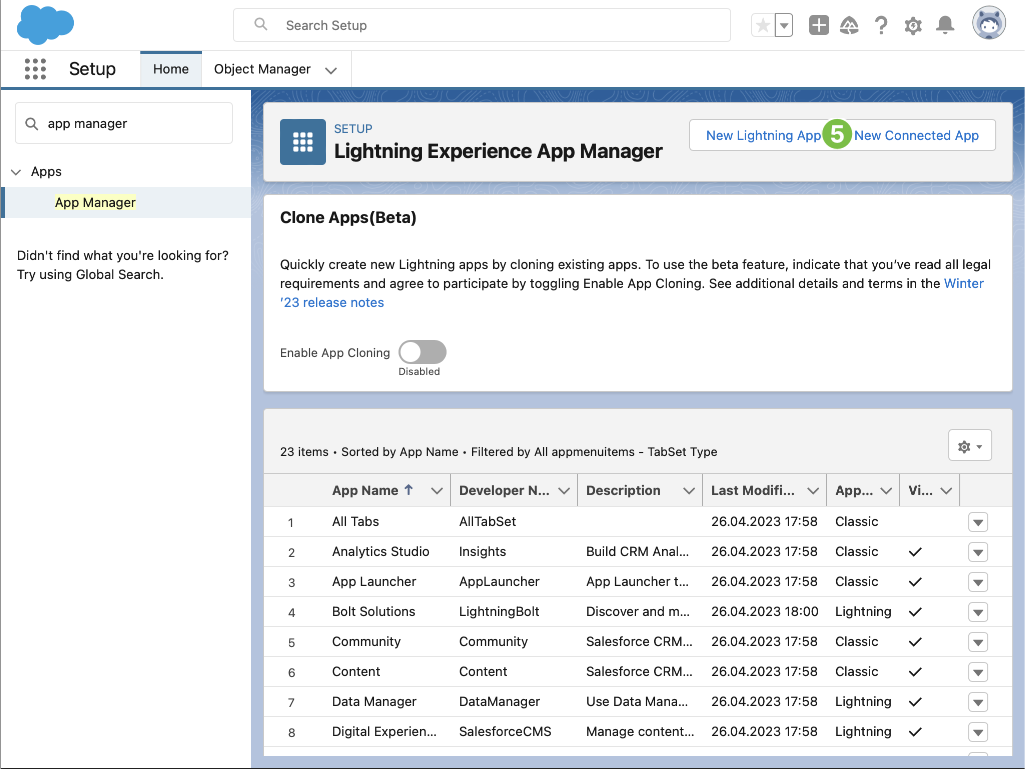
Press New Connected App button in the top right corner
-
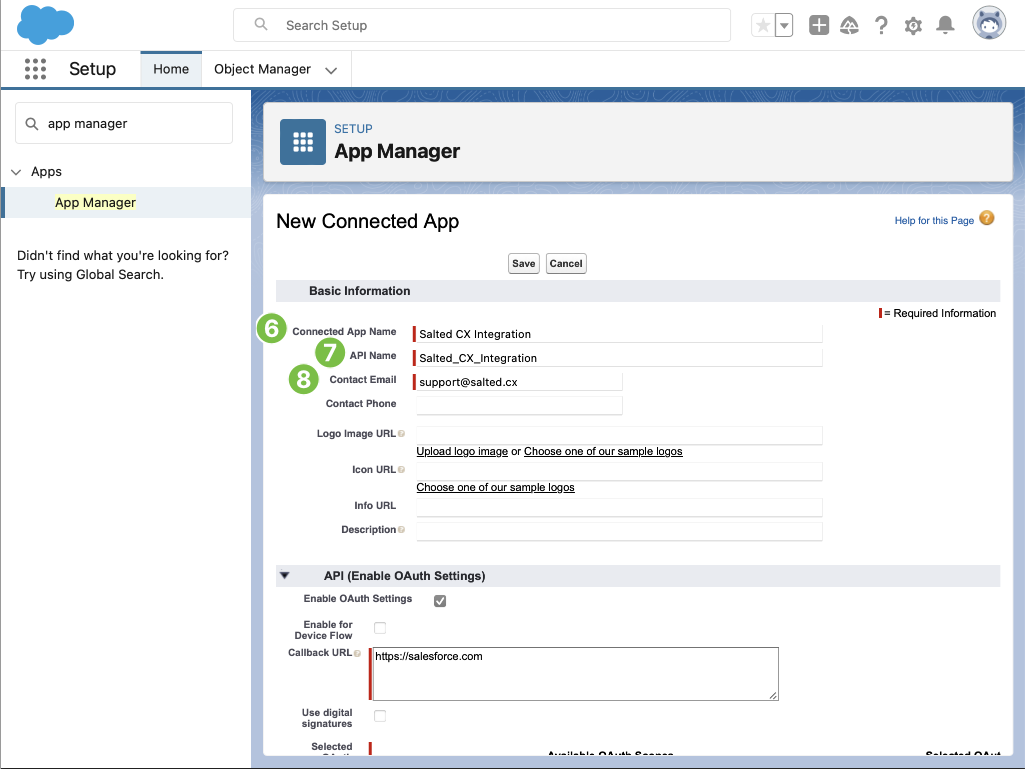
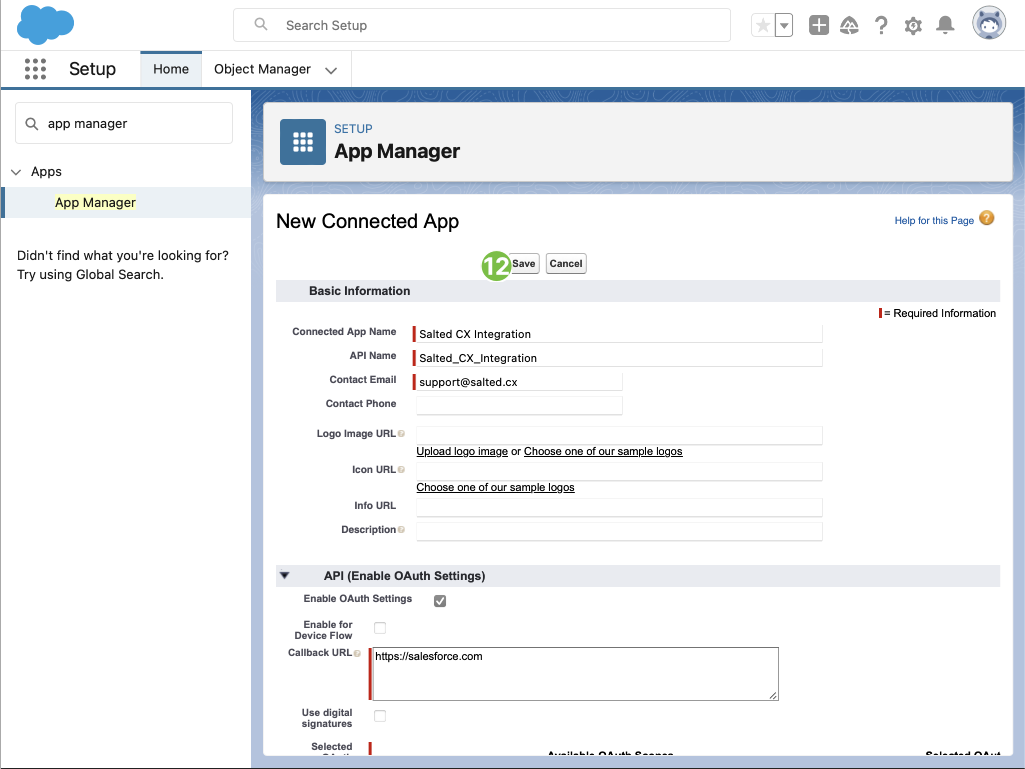
Type Salted CX Integration into the Connected App Name
-
API Name will be automatically filled by Salesforce based on the name above, leave it as it is
-
Type support@salted.cx into Contact Email
-
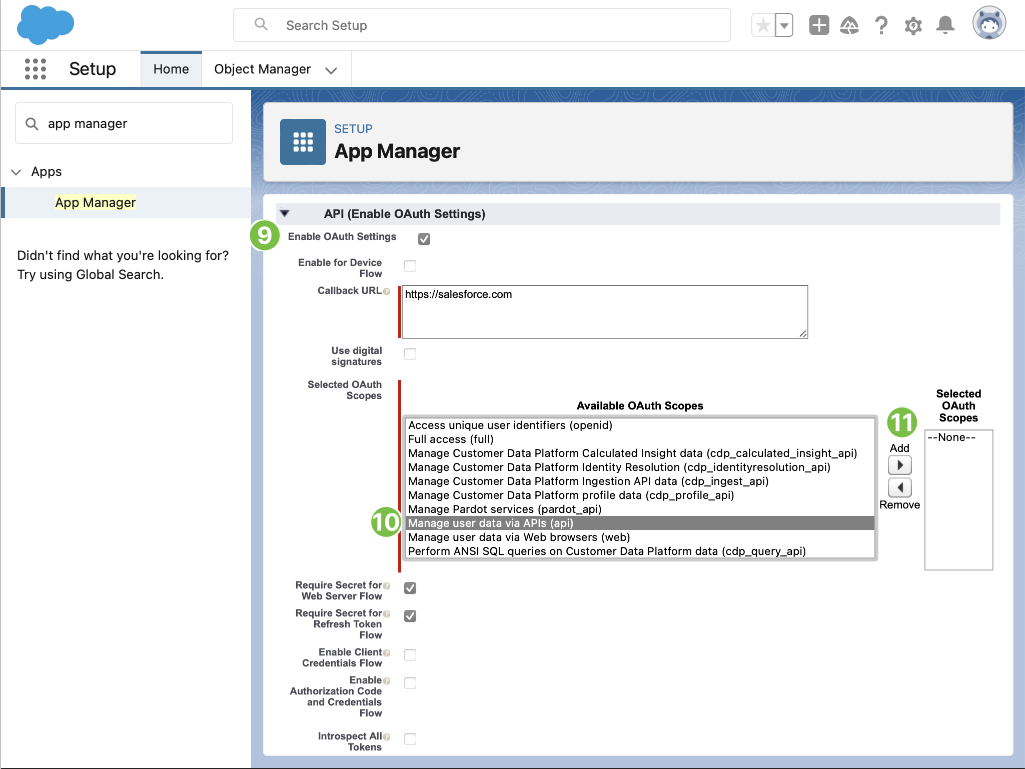
In the Enable OAuth Settings section check Enable OAuth Settings
-
Although Callback URL is mandatory it is not important for the integration. Just use https://www.salesforce.com or any other URL
-
In Selected OAuth Scopes section in Available OAuth Scopes choose Manage user data via APIs and press Add right arrow to add the scope into Selected OAuth Scopes
-
Press Save button, keep the other settings as they are
-
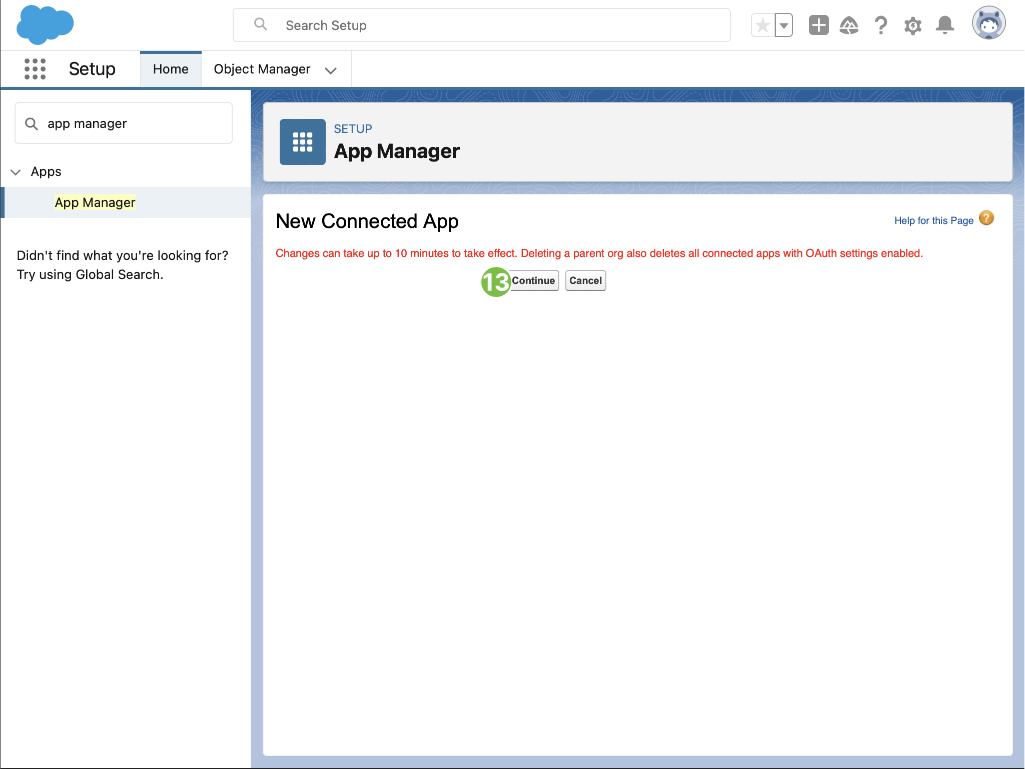
Press Continue button
-
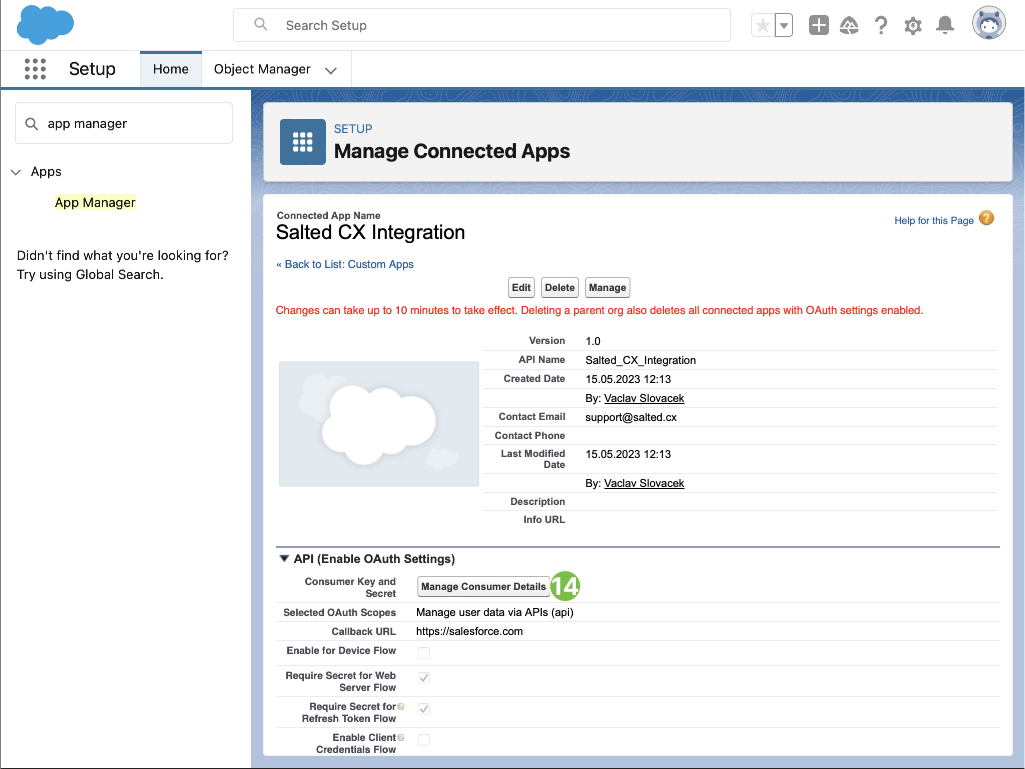
In API (Enable OAuth Settings) section press Manage Consumer Details button in the first line
-
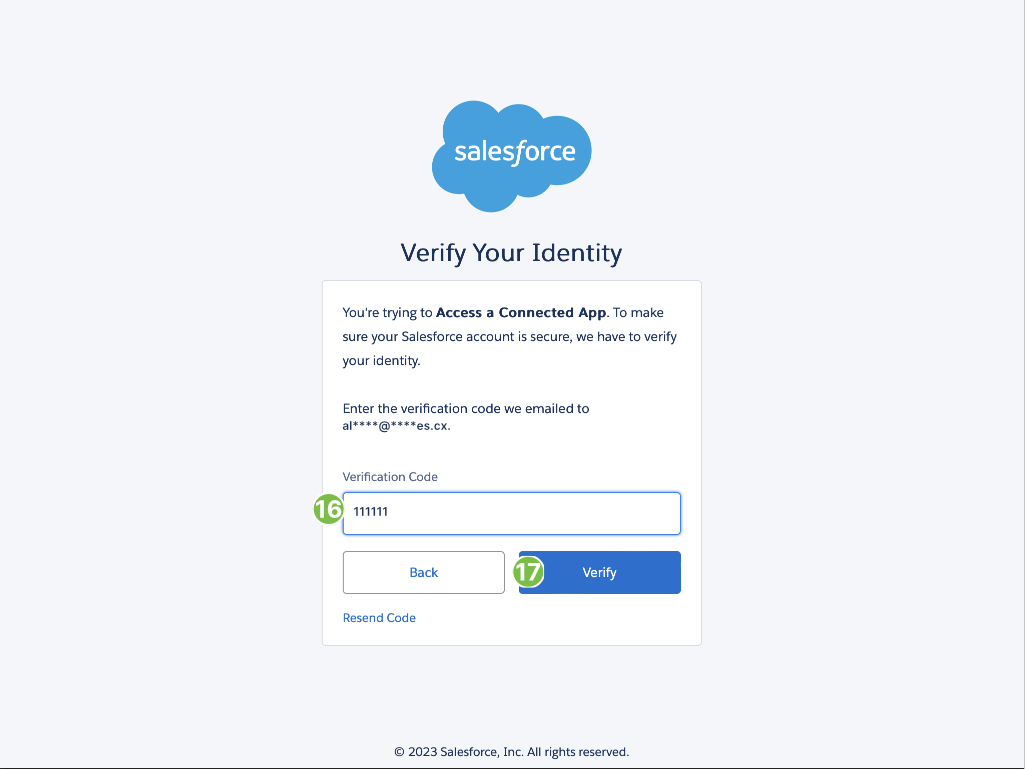
Open your email inbox and copy the received verification code from Salesforce
-
Paste the copied code to Verification Code field
-
Press Verify button
-
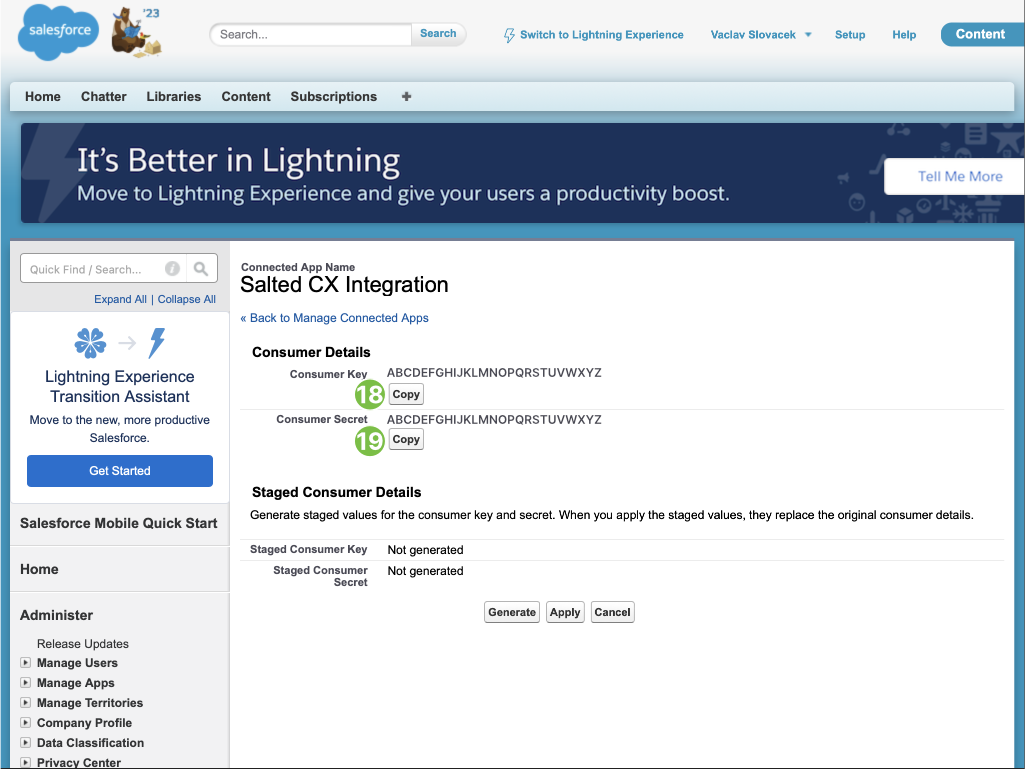
Press Copy button in Consumer Key line and safely store it
-
Press Copy button in Consumer Secret line and safely store it
Create Salesforce Profile
The following steps create a Salesforce profile that limits access of Salted CX integration to Salesforce features and data. These instructions focus on giving minimal necessary access to Salted CX:
-
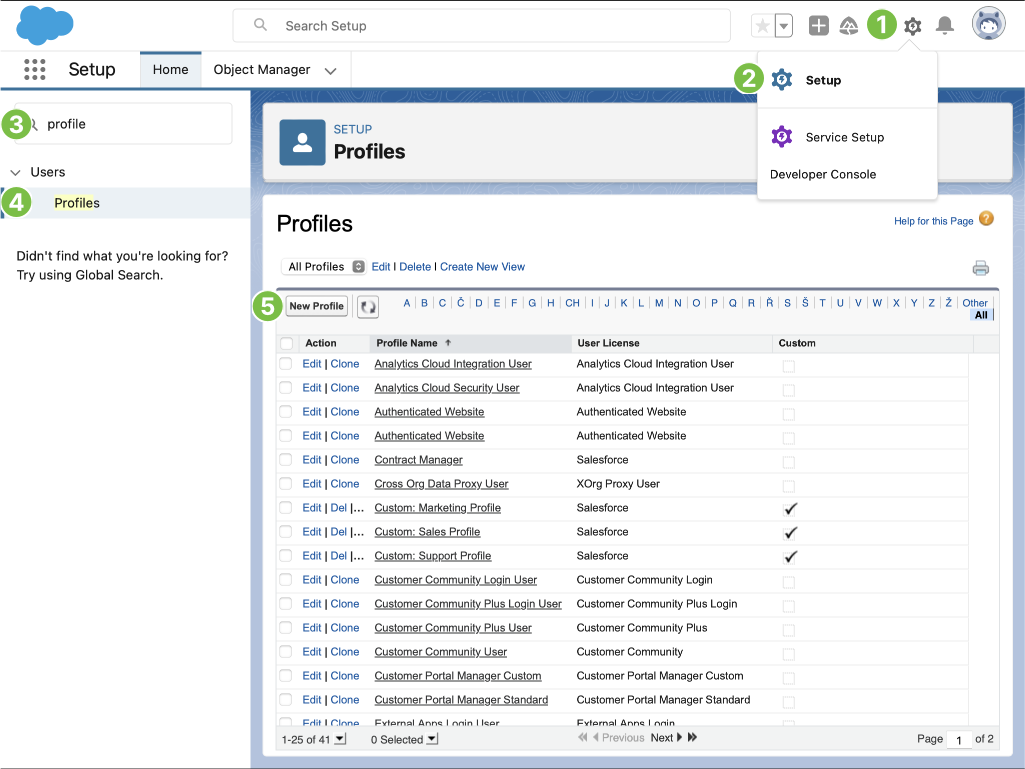
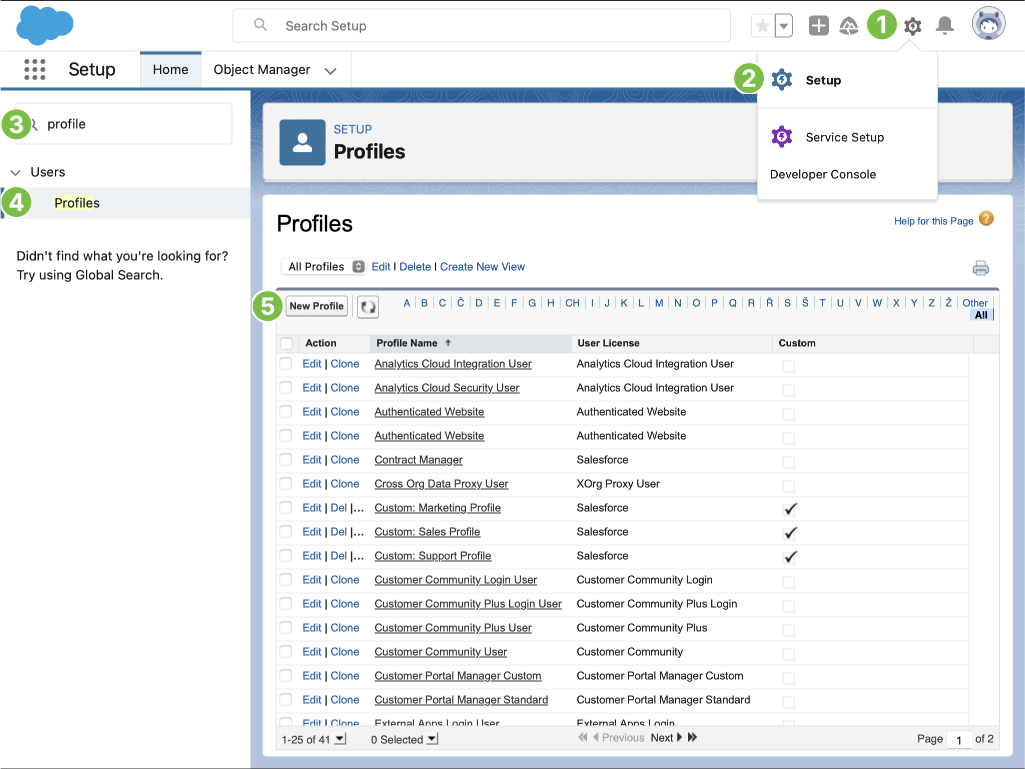
When logged in to your Salesforce, press gear button in the top right corner
-
In the menu press Setup
-
In the Setup application, press the Quick Find field in the top right corner and search for Profiles
-
Press Profiles in the navigation to open it
-
Press New Profile
-
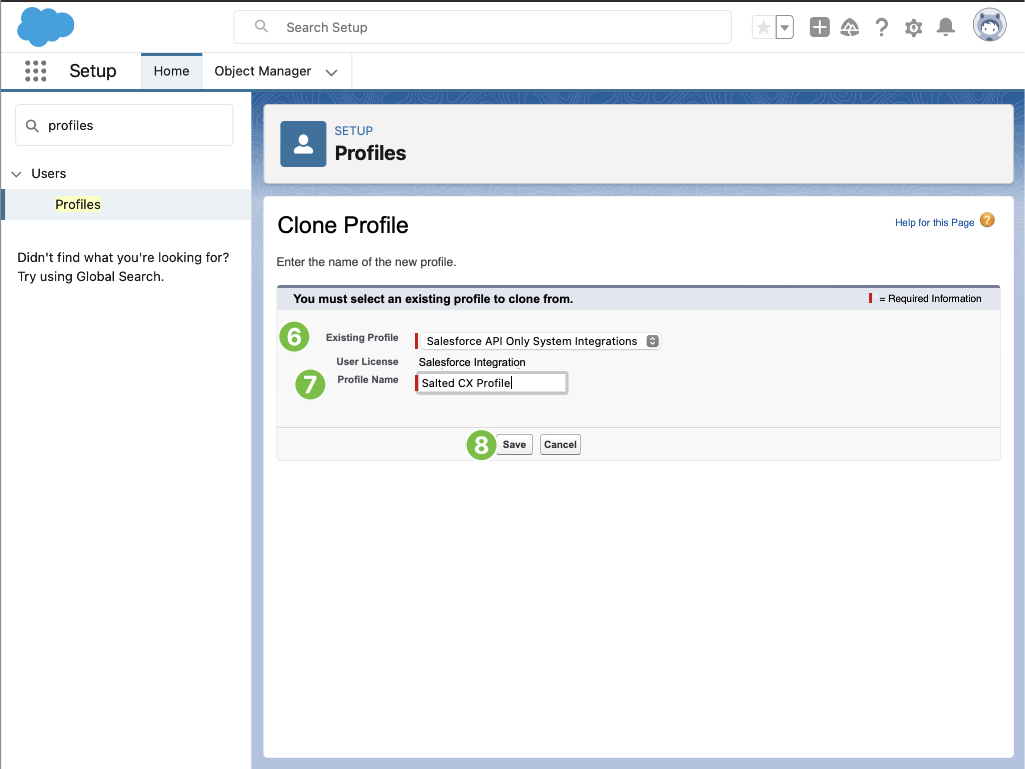
In Existing Profile choose Salesforce API Only System Integrations
-
Type
Salted CX Profileinto Profile name field -
Press Save
-
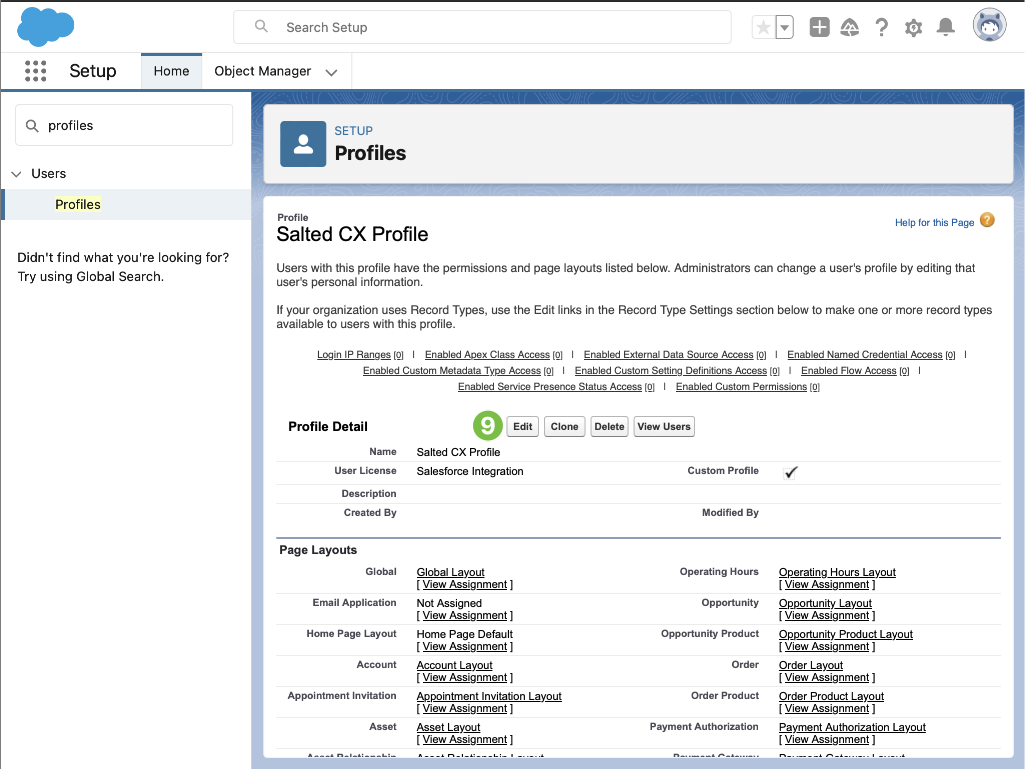
Press Edit
-
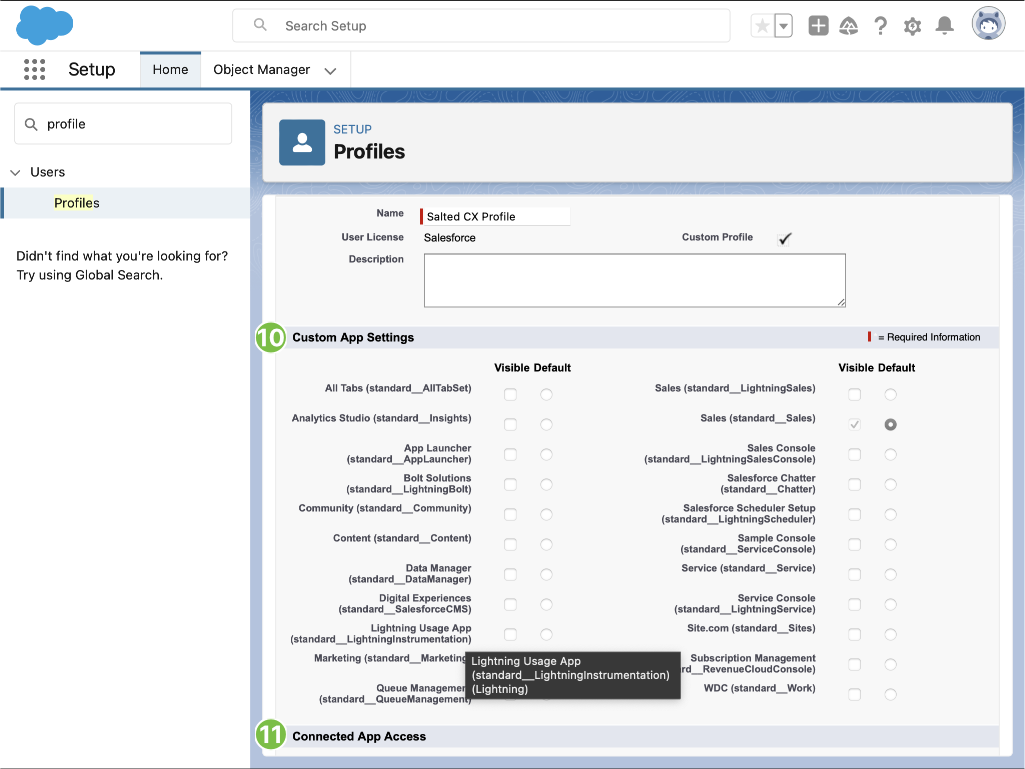
Uncheck everything you can in Custom App Settings
-
Uncheck everything you can in Connected App Access
-
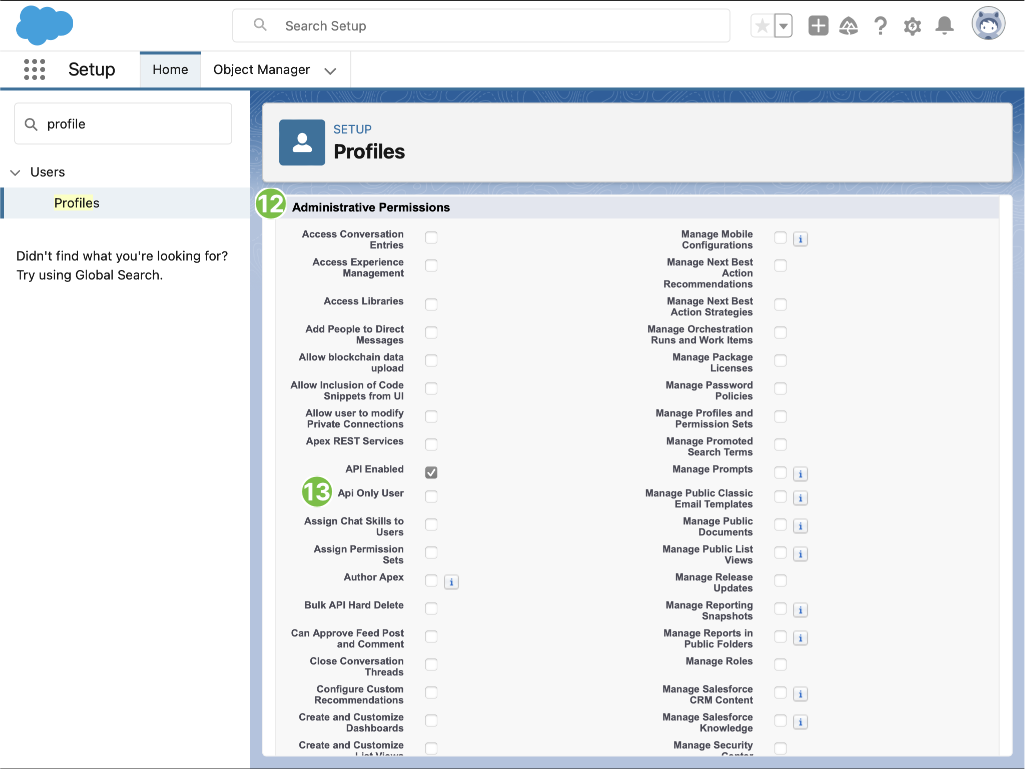
In Administrative Permissions uncheck everything you can EXCEPT:
- API Enabled
- Lightning Experience User (temporarily useful for this setup)
- View Roles and Role Hierarchy
- View Setup and Configuration
-
Make sure Api Only User checkbox in unchecked (UI access is needed later in the setup, can be disabled later)
-
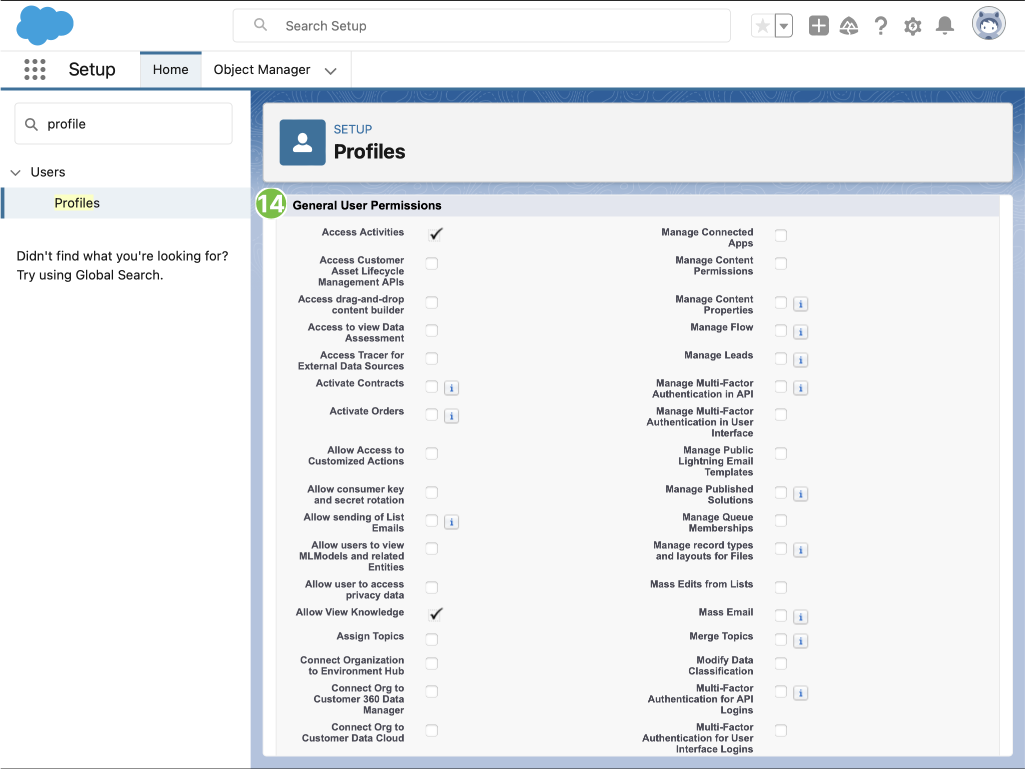
In General User Permissions uncheck everything you can
-
In Standard Object Permissions section make sure the following objects have Read and VIew All checkboxes checked:
- Accounts
- Agent Work
- Assets
- Call Disposition
- Call Disposition Category
- Campaigns
- Cases
- Case Comment
- Case History
- Contacts
- Customers
- Chat Sessions
- Chat Transcripts
- Chat Visitors
- Email Messages
- Group
- Leads
- Live Chat Transcript
- Messaging Sessions
- Messaging Users
- Opportunities
- Products
- Profile
- Record Type
- Queues
- Queued Parties
- Queue Messaging Template
- Refunds
- Service Channel
- Shifts
- Surveys
- Survey Invitations
- Survey Question Choice
- Survey Question Response
- Survey Responses
- Survey Subjects
- Tasks
- User Service Presence
- Work Orders
 note
noteYou can enable access to more objects than listed above. The listed objects are those that Salted CX expect access to. Enabling access to more objects prevents you from having to update the profile in case there are new features in Salted CX that require additional objects. Salted CX does not hoard data. It downloads only data necessary to support its current set of features.
-
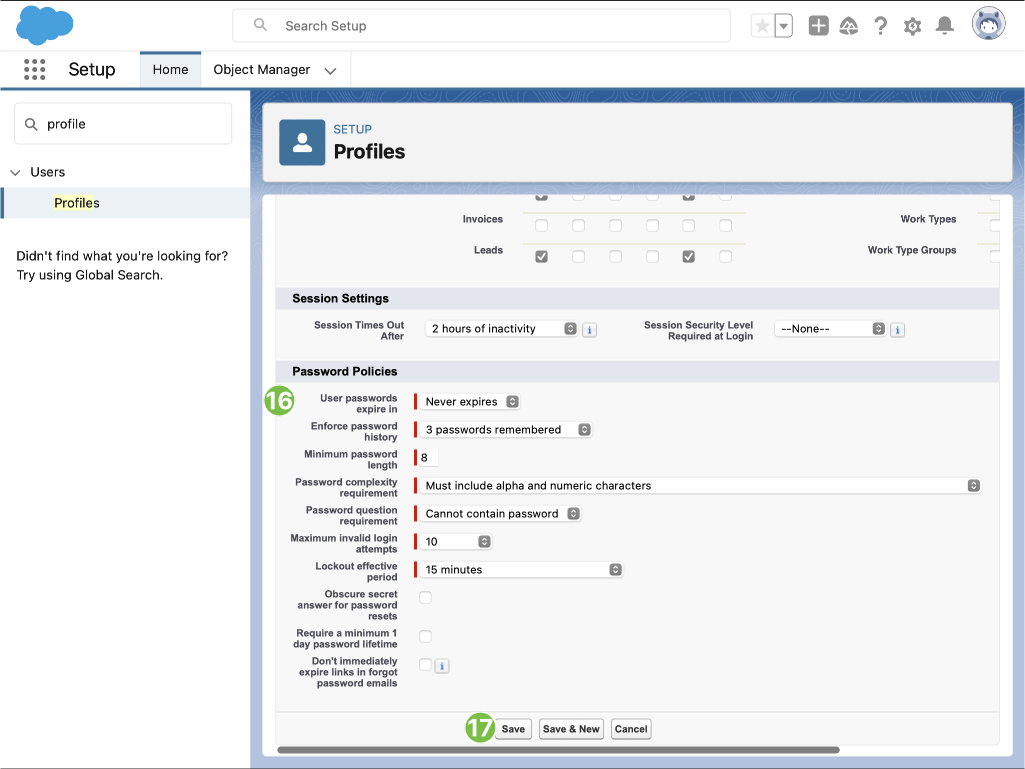
In Password Policies for User passwords expire in choose Never Expires
-
Press Save
Now you have a profile that is a single place where you can manage what Salted CX can access.
Create Salesforce API User
Create Salesforce user that Salted CX will use to access the API in these steps:
-
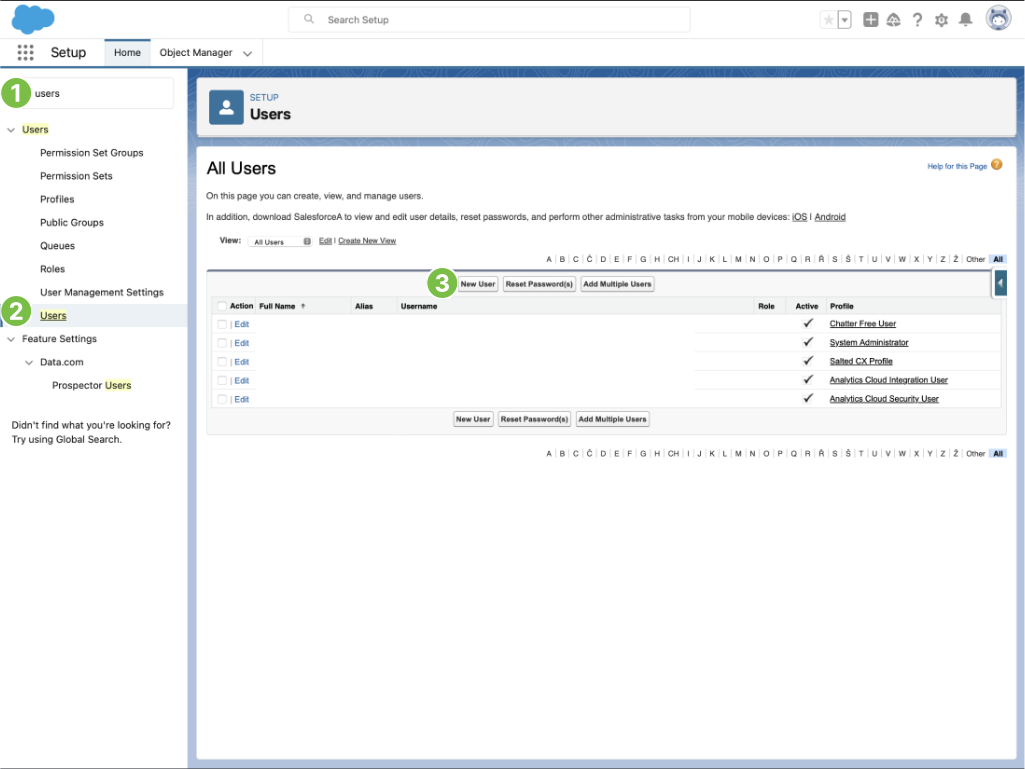
Search for Users in the left navigation in Setup
-
Press Users
-
Press New User
-
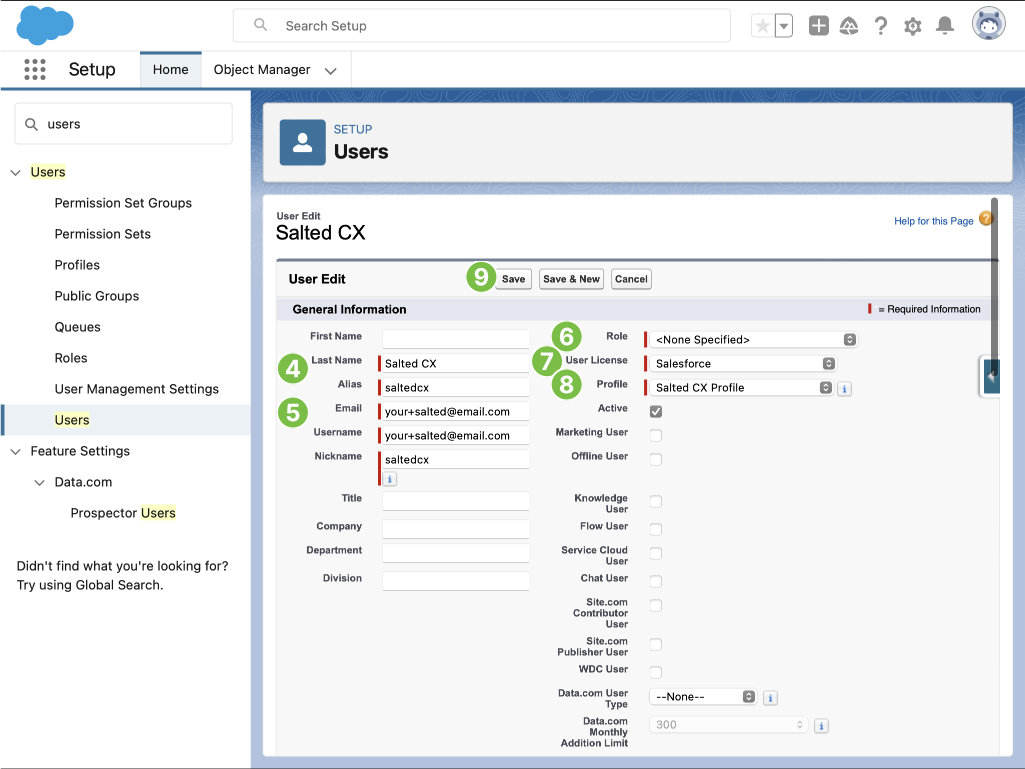
Fill in mandatory user information
-
Make sure you fill an email address you have access to. You will use it to get a new Security Token
-
Leave Role value set to <None Specified>
-
Choose Salesforce in the User License menu
-
Choose the created Salted CX Profile in the Profile menu
-
Press Save
-
Log in as the newly created user, and set or reset your password if necessary
-
Securely store the user’s username and password to share it with Salted CX
Now you have a user that will be used by Salted CX to download data from Salesforce.
Get New Security Token
The security token is used by Salted CX to authenticate in Salesforce. The security token is part of credentials for API access to your data in Salesforce.
Follow these steps to retrieve the Security Token for the API user:
-
Log into Salesforce under the user create in the step Create Salesforce API User
-
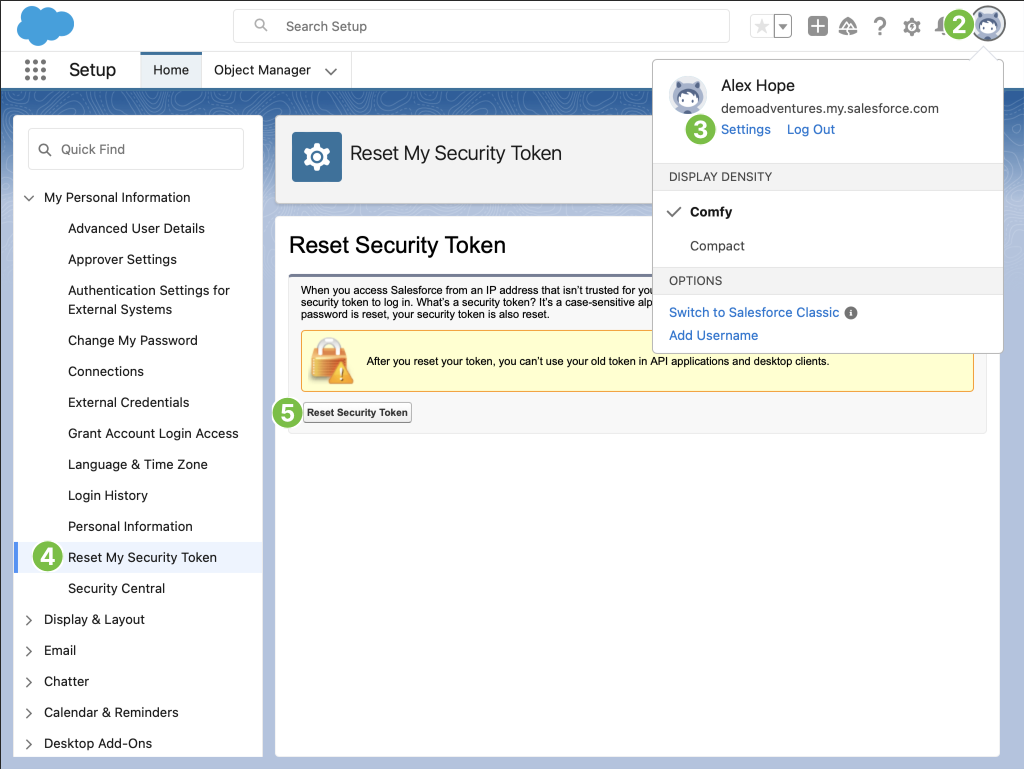
Press the user avatar in the top right corner
-
Press Settings in the menu
-
In the navigation on the left press Reset My Security Token
-
Press Reset Security Token button on the screen
-
Check you email inbox, you will receive the Security Token, copy it and safely store it <details> <summary>After you retrieve the Security Token you can disable access to the UI for the API user</summary>
-
Go to Salted CX Profile created in the step Add Connected Application
-
Press Edit
-
Check Api user only checkbox in Administrative Permissions
-
Uncheck Lightning Experience User in Administrative Permissions
-
Press Save
</details>
Credentials
Now you should have all information necessary for Salted CX to connect to your Salesforce. Please share all the credentials with Salted CX safely.