To integrate Universal Chat to your web page, you should take the following steps:
- Setup a brand. In Universal Chat Settings you can customize how the universal chat behaves and looks. You also can list domains that are allowed to include Universal Chat.
- Include integration code into your web page. Use the code that you get form Universal Chat Settings and paste it into your web page to show the web chat to the customer.
- Pass customer ID to the chat. This is optional but highly recommended as it enables to link the customer to their data.
Setup a Brand
You can set up a Universal Chat brand directly in the Salted CX app. The brand enables you to customize the behavior and look of the chat. You can set up multiple brands to provide different customer experiences for different segments of your customers.
Include Code in Page
Copy the integration code for the brand of your choice from Universal Chat Settings and paste into into your web page.
The code has two parts. Include the following snippet in the head section of the HTML file:
<script type="module" src="https://saltedcx.github.io/universal-chat-web-component/universal-chat.js"></script>Place the following code at the end of your body of your HTML file:
<universal-chat accountid="<domain name in Salted CX without region>" brandId="<unique identifier of the brand from Universal Chat brand settings>"></universal-chat>Make sure you list your website domain in the allowed domains section of the settings. The brand can only be embedded into the domains you list there.
Example of implementation using JavaScript only
const scriptElement = document.createElement('script');
scriptElement.type = 'module';
scriptElement.src = 'https://saltedcx.github.io/universal-chat-web-component/universal-chat.js';

const chatElement = document.createElement('universal-chat');
chatElement.setAttribute('accountid', '<domain name in Salted CX without region>');
chatElement.setAttribute('brandId', '<unique identifier of the brand from Universal Chat brand settings>');

document.body.appendChild(scriptElement);
document.body.appendChild(chatElement);
Pass Customer Data to Chat
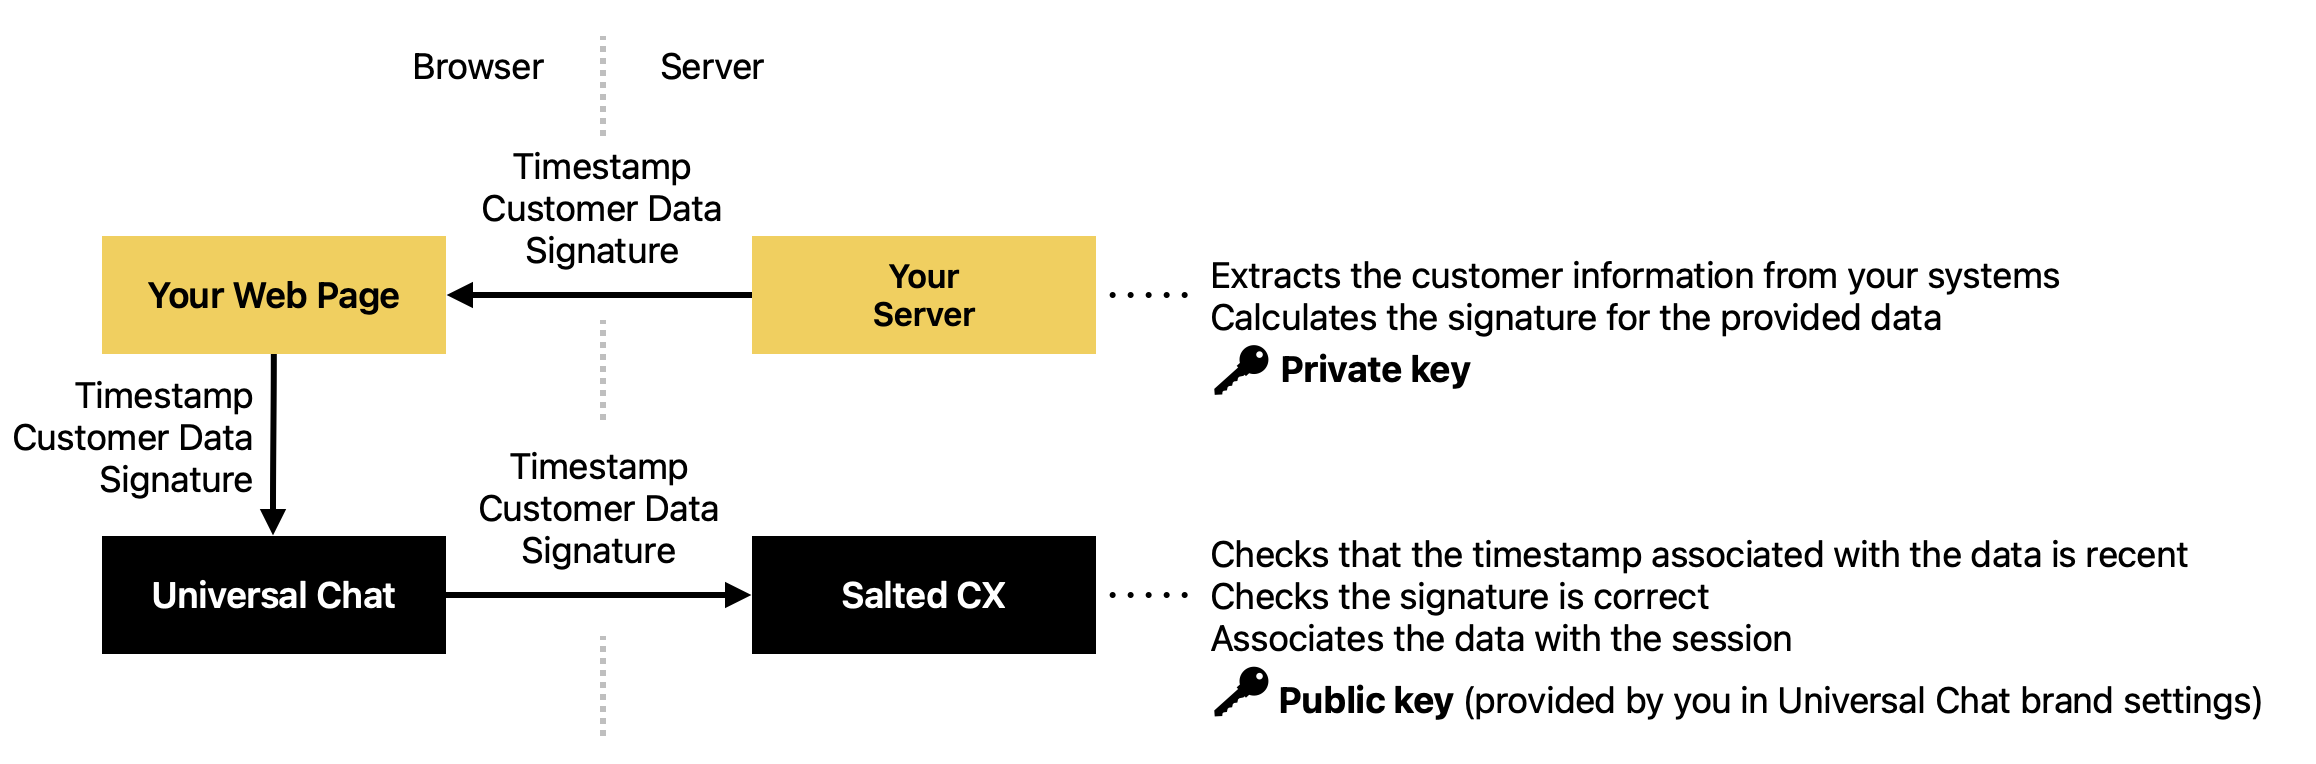
Passing customer data enables linking the chat session to a specific customer. This enables Your Logic and human agents to access the customer data. Salted CX requires that you digitally sign the data in a save environment (server side) so the bad actor cannot impersonate somebody else. Salted CX verifies the data on the server side as well.
Custom Data Format
You need to provide the data in a format supported by Universal Chat. The data are in JSON format.
The payload
| Property | Type | Description |
|---|---|---|
conversation | Object | Structured object containing information about the conversation. |
customer | Object | Structured object containing information about the customer. |
Conversation Object
Properties in the conversation object:
| Property | Type | Description |
|---|---|---|
custom | JSON | Custom JSON that contain conversations that is customer specific. |
Customer Object
Properties in the customer object.
| Property | Type | Description |
|---|---|---|
contact | Contact Object | The contact this chat session is associated with. This can be either an internal customer ID or some global identifier such as email. |
displayName | String | Name of the customer that agents will see. This name SHOULD not contain protected personal information. We recommend using the first name. The length of the value is limited to 100 characters. |
relatedContacts | Array of Contacts | The list of related contacts to the customer. These contacts enable to link the customer to other conversations in the customer journey. So if you have a past conversations in other channels you will see them in the customer journey with the current Universal Chat session. Learn more about Customer Profile |
Contact Object
Properties in the contact objects.
| Property | Type | Description |
|---|---|---|
type | String | Type of the contact. Use Email and Phone value for emails and phones. You can use other values to distinguish the contact type, for example Customer ID for internal customer IDs. |
externalId | String | The actual contact information — ID, phone, email, value. The length of the value is limited to 100 characters. |
{
	 "conversation": {
		  "custom": {
		  }
	  }

	"customer": {
		"contact": {
			"type": "Customer ID",
			"externalId": "9e065dd3-14e2-4c67-832c-03b320be65c1"
		},
		"displayName": "Carmen",
    "firstName": "Carmen",
    "lastName": "Sanchez",
    "language": "en",
		"relatedContacts": [
			{
				"type": "Email",
				"externalId": "[email protected]"
			},
			{
				"type": "Phone",
				"externalId": "+420123456789"
			}
		]
	}
}Create a JWT token
To pass data to Salted CX, you need to create a JWT token that contains the customer data, expiration time, signature, and a few other properties required by JWT.
- Generate a private and public key pair.
- Store your private key in your secrets manager where your server code can access it.
- Paste your public key for verifying the signature of the requests. Go to Universal Chat settings and paste the value Customer Data Signature Key.
Once you have encryption keys setup you need to implement creation of JWT token with the desired payload.
{
  "header": {
    "alg": "RS256",
    "typ": "JWT"
  },
  "payload": {
	  "conversation": {
		  "custom": {

		  }
	  }

    "customer": {
      "contact": {
        "type": "Customer ID",
        "externalId": "9e065dd3-14e2-4c67-832c-03b320be65c1"
      },
      "displayName": "Carmen",
      "firstName": "Carmen",
      "lastName": "Sanchez",
      "language": "en",
      "relatedContacts": [
        {
          "type": "Email",
          "externalId": "[email protected]"
        },
        {
          "type": "Phone",
          "externalId": "+420123456789"
        }
      ]
    },
    "iat": 1730314320,
    "exp": 1730400720
  },
  "secret": "your-256-bit-secret"
}
Example JavaScript code for generating a JWT token
import fs from "node:fs";
import path from "node:path";

import { importPKCS8, SignJWT } from "jose";
import { v4 as uuidv4 } from "uuid";

async function generateSaltedCXToken(customerData) {
	try {
		const privateKeyPEM = fs.readFileSync(path.join("private.key"), "utf8");
		const privateKey = await importPKCS8(privateKeyPEM, "RS256");

		return await new SignJWT(customerData)
			.setProtectedHeader({ alg: "RS256", kid: "key-1" })
			.setIssuedAt()
			.setExpirationTime("24h")
			.sign(privateKey);
	} catch (error) {
		console.error("Error generating JWT token for Salted CX:", error);
	}
}

const jwtToken = generateSaltedCXToken(
		{
			customer: {
				contact: {
					type: "Customer ID",
					externalId: uuidv4(),
				},
				displayName: "Display Name",
				relatedContacts: [
					{
						type: "Email",
						externalId: "[email protected]",
					},
					{
						type: "Phone",
						externalId: "+420123456789",
					},
				],
			},
});Pass Customer Data via JavaScript
You need to have the JWT token available on the client side (browser) to pass to Salted CX. The exact way to make it available depends on the tech stack that you are using. Your JavaScript code can retrieve it using AJAX, from cookies or local storage, or any other method that works in your environment.
Once you have the JWT token available in the browser, you can pass it to Salted from the browser.
window.SaltedCX.setContext(jwtToken);Embedding in iOS
The webView in the iOS app must handle links with target="_blank" to support downloading documents from Universal Chat. To achieve that, the WebView Coordinator should implement the following method:
 // Handle target="_blank" links by opening them in Safari
func webView(_ webView: WKWebView, createWebViewWith configuration: WKWebViewConfiguration, for navigationAction: WKNavigationAction, windowFeatures: WKWindowFeatures) -> WKWebView? {
    if let url = navigationAction.request.url {
        print("Opening link in Safari: \(url.absoluteString)")
        UIApplication.shared.open(url)
    }
    return nil
}
Embedding in Android
To ensure that customers get all the features of Universal Chat. You have to ensure the Android app has all the required permissions.
Ensure the AndroidManifest.xml contains the following permissions:
<uses-permission android:name="android.permission.READ_EXTERNAL_STORAGE" />
<uses-permission android:name="android.permission.WRITE_EXTERNAL_STORAGE" />
<uses-permission android:name="android.permission.INTERNET" />
<uses-permission android:name="android.permission.CAMERA" />
When using WebView ensure that these settings are set:
// Enable JavaScript
webView.settings.javaScriptEnabled = true
webView.settings.domStorageEnabled = true
webView.settings.databaseEnabled = true
webView.settings.cacheMode = WebSettings.LOAD_DEFAULT

// Enable file access
webView.settings.allowFileAccess = true
webView.settings.allowContentAccess = true

// Set DownloadListener to handle file downloads
webView.setDownloadListener { url, userAgent, contentDisposition, mimetype, contentLength ->
	val intent = Intent(Intent.ACTION_VIEW)
	intent.data = Uri.parse(url)
  startActivity(intent)
}